Part Two: Automations
n
In the first session you made two Trello boards from our templates: the Planning Board and the Action Board. Then you spent some time thinking about your home, and setting up some lists of tasks to do in each room.
nn
In this session I’m going to show you how to use Trello Automations set up your Action board so that it is ready to recieve and assign those tasks. at the end of this series, you won’t have to spend any time figuring out what your to do list should be each week, and you’ll keep track of important things that need to happen from time to time.
n

Today’s session is going to be a lot. Here’s a picture of Rudy the Heeler for moral support. He believes in you!
nn
Most of the magic happens on the Planning Board, but I’m going to have you start with the Action Board to get you used to the logic of the Trello Automations. Before we get going, let’s re-visit some things from last time.
n
Before we Start: Add Your Humans
n
Remember in our first session when I had you skip the step where you invite people to your workspace? It’s time to revisit that instruction.
nn
Trello is a product that exists to make money. They offer a free version with a lot of functionality, but they are really intended for businesses who need more robust tools and are happy to pay for them. The free version is probably sufficient for your purposes, but if you ever outgrow this plan, you should understand how they bill.
nn
Trello uses a Workspace model. In a business this might be a company with 100+ people. The workspace chooses a plan, and Trello bills a small amount of money per person per month. The company can invite guests to one of their boards for free, but if that guest uses more than one board, they are charged the same as one of the members of the workspace.
nn
In your household, think about who needs access to all of the boards, and who is just going to find their chores on the Action Board and take care of things. Maybe the adults would like to be able to use more than one board to help with the planning, or to add other boards with their own set of regular tasks. For example, I have a board on my workspace for the garden. Alternatively, maybe the kids only need to see the Action Board on their own accounts. It’s up to you, but you should be aware. Later if you choose to upgrade your plan, you only have to pay for the users who really need to have access to all of your boards.
nn
For now, let’s invite some your family to your Action Board. Later, you can choose if you want to add any of them to your workspace so that they can use the Planning Board too.
nn

On the Action Board, click the blue box to add your people.
nn
Everyone will receive an invitation, and will have to set up a Trello account for themselves. They can make their own personal workspaces, that’s fine. They will be guests of the Action Board for now.
n
nIf you are curious, here are the steps to add people to your workspace:

n
n
Adding people to your workspace is still free for now, and it lets them help with the planning.
n
Next Step: Set up some rules
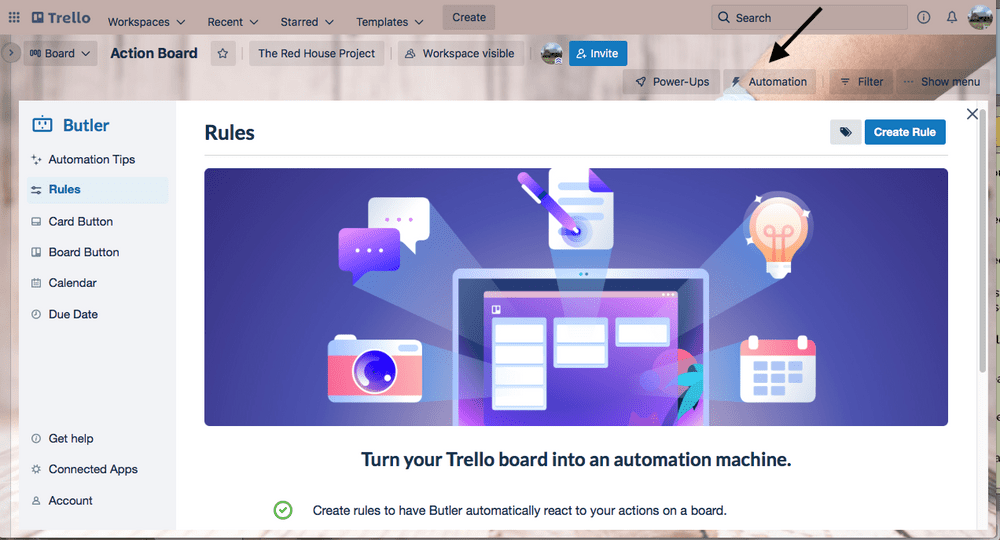
The arrow is pointing to the Automation button. Click it to open this screen.
nn
The Automation program is called Butler, and this is its main screen. From here you can create different kinds of automations: rules, buttons, calendar, and due date.
nn

When you click Create Rule, this happens
nn
Butler Rules consist of a Trigger and and some Actions. These tell the program “When This happens, Do That.“
n

When you click Add Trigger, this screen opens.
nn
In this screen shot, the arrow is pointing to the Advanced toggle. Make sure that is turned on.
n
Rule One: Due Dates
Let’s make a rule that moves completed tasks to the done pile. I call this the Dopamine Rule, because it is very satisfying to check those boxes when the job is done.
nn
Scroll up and look at that last image again. See how the tab Dates is dark? Click Dates, and then look for the second choice, the one that says “when the due date is marked as complete in a card.” There are some little boxes, but we don’t need them this time. Click the + to choose that trigger.
n

From here, you can add some actions. First, find the Move tab, the. Find the action “move the card to the top of list” and select “Completed This Week!“ from the dropdown box. Click the + to add it to your rule.
n

Now select the Cascade tab, and find “For each card linked in the attachments.” Add that to your action list. This extra instruction won’t do anything now, but later on it could come in handy so let’s add it.
n

Navigate back to the Move tab and add “archive the card.” Then click Save.
nn

Back on your Rules list, you should have a rule that looks like this. Success!
n
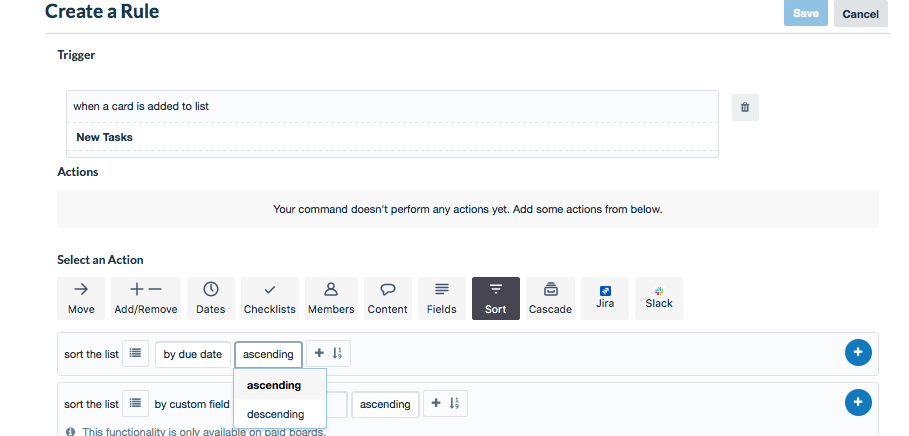
Rule Two: Sort by Due Date
Next, let’s make a rule to sort the new incoming tasks. Once the Planning Board is set up, tasks will be coming and going every week with different due dates depending on how soon they are scheduled to be completed. This rule sorts that New Tasks list so that the highest priority tasks float at the top of the list.
nn

Here is how the rule looks when it is saved. Take a minute to see if you can figure out how to set it up, and then check against the instructions.
nn
Click Create Rule, then Add Trigger, and select the Move tab. From there, find the rule “When a card is added to List” and choose New Tasks from the dropdown.
nn

Like this
nn
Then select the Sort tab, and choose “sort the list by due date ascending.” Save Rule.
n
Rule Three: Claim a Task
This next rule will move task cards into your list when you join them, as long as nobody else has claimed them first.
nn
Before you get started, make sure everyone in your household has accepted your invitation to the board So that their usernames show up in the dropdown menus.
nn
For your Trigger, navigate to the Card Changes tab and find the option that says “when @username is added to a card.” Choose your username from the dropdown, but don’t click + to add it yet.
nn

Next, Click the box that looks like a funnel. Choose “not assigned to” member, and then pick the first household member in the dropdown list, and click the grey +.
nn
Like this:

Repeat this for every member of your household before adding the trigger.
n

It’s kind of silly, but it is what Trello understands.
n

On the Move tab, make an action that moves the card to the top of your list.
nn
Do you remember how to add the action to sort the cards by due date ascending? Add that too, and save the rule.
n
Repeat for all Household members
Sometimes we repeat rules that follow the same action path with small changes. In this case, we have to duplicate this rule for every member of the household. Trello makes it easy to copy rules, here’s how you do it.
n

Click the Copy icon by the rule you want to duplicate.
nn

From here, delete the Trigger. Your actions will go away, but once you choose a new trigger you will see them again.
nn
Just like in the Rule Three directions, navigate to the Card Changes tab and find the option that says “when @username is added to a card.” This time, pick a different member of your household, and then, one at a time, choose “not assigned to” everybody else.
nn
Once you add your trigger, change the action to move the card to the right person’s list. You don’t have to delete the entire action, you can change the list from the dropdown in the Actions section.
n

Rule Four: Let’s Do It Together!
n
I’m sorry about this next rule, especially if you have lots of people in your household. You’re going to have to repeat this rule for every possible pair.
nn
Create Rule, Add Trigger. Now, begin the same way you did in Rule Three. Find “When @username is added to a card” Choose the little funnel icon, and do this:
nn
n
n
This time you want “assigned to member,” instead of “not assigned to.” Pick one of the other household members, and click +, and then + again to add your trigger.
nn

Create some actions that move the card to the top of the list “Lets Do It Together” and then sort the list by due date ascending.
n
Repeat for all Household members
Just like you did before, copy this rule and change the trigger. Repeat for each combination of household members. For example, when they are all set up a three person household will have six rules of this type.
n
Tag your rules
n
OK. The last thing I want you to do for this lesson is to add a tag to all of the rules you made today. This can be something easy, like “Action!” because you use them on the Action board, or you can get more granular. Pick something that makes sense to you, and that will still make sense when you look at it again next year.
n

Click the little tag icon, and name the tag.
n
Good Job Creating Trello Automations!
n
Once you learn how the logic works, making Trello Automations can be a lot of fun. The things you learned in this session will give you a head start next time. Until then, you can add jobs to the New Tasks list right in the Action board. Try giving them due dates, and let everybody choose what they want to work on this week.
n
Next Session
n
In Part Three, we’re going to look at Due Date rules. That is the next piece you need to do to set up your Planning Board, and it will seem much easier now that you’ve finished today’s session. If you have any questions please reach out! I will be happy to answer them. If you comment on this post, you might help somebody else who is feeling confused too!
nn
Please join our mailing list for regular but not exhausting email updates, and follow us on twitter, facebook, instagram and pinterest. See Below!